Happy New Year – blwyddyn Newydd Dda!

Happy new year everyone! ( Or blwyddyn Newydd Dda! as we say here in Wales! ) I hope you all had a fantastic Christmas time and new year. We had a wonderful time! We kept up with our family traditions and have been out and about in the fresh air lots! One of our favourite places to go is a woodland walk not far from our home, which has some beautiful waterfalls, so we visited on Christmas Eve ( complete with Santa hats of course)!

IMG_3714.JPG

We also went on a very scenic walk on one of the Welsh Coastal Paths which passes plenty of horse fields (much to the kids delight)! This is one of my favourite places ever and is a great place to clear your head. I love running along this trail when the weather brightens a little!


IMG_0032.JPG

The Christmas Eve parcels went down a treat too! The kids loved the home made reindeer food and they had great fun sprinkling it on the lawn on Christmas Eve!

IMG_3719.JPG

IMG_3725.JPG

It has been so nice just spending time together as a family. It sometimes feels that in the present time we don’t tend to just sit, breathe and spend time together. Modern day living has people running around on full speed hardly daring to take a breath. One of the things I will be trying to focus on more in 2016 is to sit and just enjoy the moment more. Have any of you made any resolutions? I usually make the same ones each year so this year I am going back to basics. I aim to spend more time sitting and savouring the little moments. Time seems to fly by so quickly these days and those little (precious) moments can get lost in the mayhem of everyday living.

grateful2

I hope you all have a brilliant 2016 full of love, health and happiness. Let’s all make some amazing memories! 🙂

A home made gift – Hot Chocolate spoons!

My little ones school broke up for their Christmas holidays the other day. They decided that they wanted to get each of their teachers a little gift to say thank you and Merry Christmas (Diolch and Nadolig Llawen as we say here in Wales)!

original_large-nadolig-llawen-decoration.jpg

We do this each year as their teachers do such a wonderful job through the year and don’t really get much appreciation or acknowledgement. I think a little thank you will always go appreciated!

Their school is a small, village school and they love going there! They used to attend a much larger school and my daughter really didn’t like it. She has developed and progressed so much since changing schools and I am very grateful to the teachers and staff for all the work which they do. The school is more like a family, and everyone’s opinions are listened to, from the head teacher to the nursery children. It is very much a community focused school too which I love! As it is such a small school there is a smaller number of staff. This means that my kids always want to give every staff member a little gift, including the cooks, cleaner and helpers!

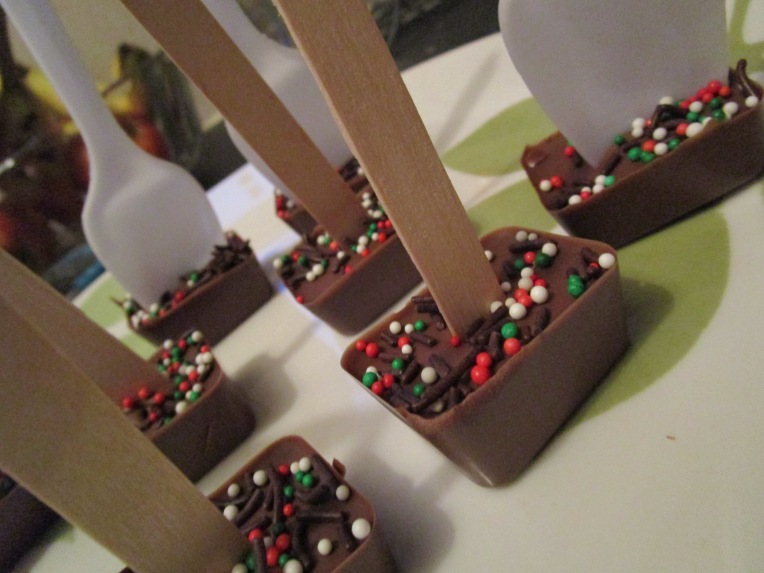
We usually give shortbread or butter biscuits as gifts, but this year I thought we would do something a little different. We decided to make Hot Chocolate spoons. We love Hot Chocolate spoons in our home as they are super simple to make, look so pretty and taste amazing!

To make Hot Chocolate spoons you will need – chocolate, plastic / wooden spoons or wooden lollipop sticks and sprinkles / decorations.

Begin by melting your chocolate in a jug in the microwave. Check it frequently to make sure it doesn’t burn! Once it has all melted, pour into an ice cube tray.

IMG_3637.JPG

Next chill in the fridge. You need it to be of a solid consistency before you can put your spoons / sticks inside, but not completely set – a sort of soft solid! You will be able to tell if the chocolate is set enough to put the spoon inside. If it has not set enough the spoon will not stand upright alone. If this is the case, chill it for longer!

IMG_3653.JPG

When you have the right consistency push your spoons / sticks into the chocolate and add your decorations (we used green, red and white hundreds and thousands and chocolate strands to make them look more festive). Mini marshmallows also look cute! (My kids love this part as they get to go sprinkle crazy)! Next, chill again, until completely set and solid. Gently push them out of the tray.

IMG_3668.JPG

I then wrapped them in spotty cellophane and added ribbon to make them look pretty and extra special!

These taste so good swirled into hot chocolate to make it taste extra chocolatey or warm milk to make chocolate milk. A very delicious treat!

IMG_3673.JPG

The teachers loved their home made gifts and said what a lovely, thoughtful, yummy gesture it was!

Nadolig Llawen to you all!

Festive Jam Bakes!

One of my family’s favourite bakes are jam tarts. My grandma used to make them for me when I was a little girl, and now I make them for my two little ones (and my hubby)! The only difference is that my kids especially love my pastry so I make the tarts quite thick, and we call them jam bakes.

My kids don’t particularly like mince pies, so I thought it would be nice to make some jam bakes with a festive twist this weekend!

Festive Jam bakes recipe – 350g (12 oz) plain flour, 3 tsp caster sugar, 1 tsp salt, 175g (6 oz) butter, 120ml COLD water and jam of your choice (Makes 12 bakes).

Begin by putting the flour, salt, sugar and butter into a bowl and mix until you have something similar to breadcrumbs.

IMG_3630.JPG

Next, add the water slowly and mix until it forms a ball. (I always use my hands for this part). Then chill for 30 minutes in the fridge.

IMG_3632.JPG

Once chilled, preheat your oven to 180c and grease a cake tray. Roll out the pastry then use cutters to cut out rounds. Place the rounds into your tray and cook for 10 minutes. Whilst they are cooking, use the remaining pastry to cut out some shapes for your toppers. I used a star cutter to give the bakes a more festive feel!

IMG_3633.JPG

When the bake bases have cooked for the 10 minutes, take them from the oven and add some jam into the centre of the bases.

IMG_3634

Add your topper to each of your bakes.

IMG_3635.JPG

Cook for a further 10 minutes, until golden brown.

We ate our jam bakes with cream whilst watching a Christmas movie. A very yummy sweet treat!


Paper cup angel – tree topper!

This weekend my daughter wanted to make an angel tree topper for the top of her pink Christmas tree, which her Taid (as we call Grandpa here in Wales!) had given her this year.

She was super excited when Taid gave her the Christmas tree, complete with baubles, beads and lights to decorate it with. She spent some time decorating it and then realised she had nothing to put on the top. I told her she could make something, so she chose to make an angel. We thought a paper cup angel would be a lovely way to top her very own Christmas tree!

To make your paper cup angel you will need – paper cup, cake case, paper, crayons, glue, sequins, glitter, wool and googly eyes / eye stickers.

IMG_3658.JPG

Begin by cutting your cake case in half and glueing each half onto each side of your paper cup. These will be the angels wings! Then decorate your paper cup with sequins and glitter. You can also use coloured paper, crayons etc, whatever you like! My daughter chose to use a pink paper cup for her angel, as we had some left over from her recent birthday party.

IMG_3665.JPG

Next, draw a mouth and nose onto a piece of paper and cut it out. Add your eye stickers or googly eyes and stick on some coloured wool for hair.

IMG_3663 (2)

Finally glue your angels face onto the front of your paper cup.

IMG_3686.JPG

Once dry, place onto the top of your Christmas tree! We think she looks absolutely wonderful and she has had lots of compliments from visitors!

IMG_3706.JPG

A beautiful, home – made angel which will take pride of place on your Christmas tree!

Fingerprint Christmas Trees!

Each year the kids love making home – made Christmas cards for family members. I think it’s lovely receiving a personal home – made card from a loved one!

I thought it would be a nice idea to make a Christmas card with my niece for her mum. I put a few ideas to her and she chose to make a fingerprint Christmas tree. I love this activity as it is so simple which means even very young children can take part!

To make your fingerprint Christmas tree you will need – paper, paints (green and a few more different colours), card, glue and sequins or glitter.

To begin cut out a template from card, to use as your tree shape. I find using a triangle shape works really well. Then place over a piece of paper and begin fingerprinting inside your template with the green paint. (If you are doing this activity with young children, you may like to stick the template to the paper with blu – tack, to stop it from moving around).

IMG_3607.JPG

Continue fingerprinting with the green paint until you have filled the tree shape. You can then add a few more fingerprints in different colours to be your tree ‘lights’. My niece also added a yellow print at the top of her tree to be the ‘star’!

IMG_3609.JPG

When you are happy with how your tree looks, gently lift up the template and allow the paint to dry. Once the paint is dry you can add sequins or glitter to give it some extra sparkle! We then cut out and glued her tree down onto a piece of card, and she made a plant pot from sequins too!

IMG_3611

My niece really enjoyed making her card and thought so carefully about which sequins she thought her mum would like best. Her mum loved her extra special card made especially for her!

Christmas Eve surprise parcels!

As most of you probably know I love Christmas! I love everything about it – the crafts you can make, the decorations, the lights, the food, the celebrations, the nativities, the time spent together as a family and of course your own personal family traditions. It is such a magical time of year, especially for children, and you can make it super special with your own family traditions.

the-magic-of-christmas.jpg

I cannot stand bah humbug people who complain about the commercialisation of it all! I do not spend huge amounts of money on things that my kids don’t need (that is not to say I don’t buy anything – of course I do)! I just don’t go over the top! I had a friend who a couple of years ago spent £1000 on each of her two children, aged 3 and 6, only for her to then complain after Christmas that they only played with a couple of the new toys she had bought them. I remember being completely flabbergasted!

To me personally, presents are only a small part of Christmas. Christmas is made up of many different things. When I was a kid, my favourite memories are of spending time as a whole family (my dad worked such long hours it was a big treat to be able to spend whole days over the Christmas period with him). I also used to love the Christmas dinner, my Gran’s mince pies and watching Christmas films on the TV. If you ask my daughter what her favourite part of Christmas is she will say Christmas dinner, Christmas Eve parcels and our Christmas Eve walk (this is one of our favourite family traditions – we go for a walk in the woods by our home and then come back for hot chocolates and a Christmas film). If you ask my son, he will say spending time with Daddy and helping to decorate the tree.

Each year one of my personal favourite family Christmas traditions is giving the kids a Christmas Eve surprise parcel! I make a little parcel of things for each of the kids to use on Christmas Eve. I never spend much money on them as I pick little bargains up or make things myself.

I made their parcels today whilst they were both in school and have hidden them away until Christmas Eve! I thought I would share with you what I have included in them this year!

IMG_3599.JPG

I bought them each a new onesie, a Christmas colouring book, a Christmas canvas picture to paint and a Santa mug filled with Hot chocolate and marshmallows. I also made reindeer food (using porridge oats and edible glitter) and wrapped it in a cellophane cone, tied with pretty ribbon. Everything I bought was bought from my local discount shop so hardly cost me anything! I then wrapped the items in pretty cellophane and secured with an elastic band. I then popped some Christmas ribbon over the top and added a little bow.

IMG_3601.JPG

IMG_3603.JPG

I love making these little Christmas parcels and giving them to the kids Christmas Eve. I can’t wait for Christmas Eve now!

IMG_3606.JPG


Christmas has arrived!

This weekend we decided to bring the Christmas tree out of hiding and start decorating. I wasn’t planning on doing it yet but the kids were asking so I thought we may as well! It does feel so much more like Christmas when the tree is all pretty and lit up!

I try and let the kids have freedom to decorate the tree themselves. This year they decorated the whole tree on their own, apart from the lights (that is Daddy’s forte)! As I was growing up my mum didn’t really let us kids decorate the tree. She usually did all the Christmas decorating whilst we were in school. I used to wait till she was cooking tea or something similar, and then sneakily take a bauble off the tree and place it somewhere I liked. I used to feel like I was missing out on quite a big chunk of Christmas and I don’t want my own two little ones to feel like that. I want them to feel very much part of the whole Christmas period!

IMG_3340.JPG

IMG_3343.JPG

As you can imagine our tree therefore usually ends up uncoordinated, mismatched and with absolutely no theme! It is covered with home-made decorations which the kids have made over the years, but are completely beautiful and precious to me. There are also decorations that have been given by family and friends, and are of huge sentimental value to me also. I know some people prefer beautifully matching, colour coordinated works of art, and of course these are aesthetically gorgeous, but since having the children that is no longer for me.I embrace the home-made look whole heartedly! Most of the decorations on our tree have their own story and hold lovely cherished memories.

We had a wonderful, lovely family day listening to Christmas songs and decorating our home! Even Sammy our dog had fun, but it is hard work decorating for Christmas! Right Sammy?!

IMG_3395.JPG

Christmas biscuits!

Today we decided to spend the afternoon baking as it was so wet and windy outside (again)! I must admit a little part of me quite enjoys the winter weather, as there is nothing nicer than being cosy inside with the little ones baking or making!

We chose to bake butter biscuits as they are a huge favourite in our house. They are simple to make and taste amazing. I usually make a few batches at a time, as they seem to disappear very quickly! I was also looking after my 6 year old niece and my (very nearly!) 2 year old nephew, and the kids all decided they would like to turn the biscuits into Christmas biscuits by adding some fun decorations! So we got plenty of ingredients and set to work…… (when I say work, I mean throwing ingredients around and getting covered in flour and icing)!

cook quote

To make your Christmas biscuits you will need – 

Biscuit recipe – 110g (4 oz) softened butter, 55g (2 oz) caster sugar, 2 – 3 tbs cold water, few drops of vanilla extract and 175g (6 oz) plain flour Topping – icing sugar, water and decorations of your choice (we used sugar sprinkles, sugar balls and mini sugar gingerbread men) You will also need cookie cutters in ‘Christmas’ themed shapes!

IMG_3239.JPG

Begin by preheating your oven to 160C. Then put your butter and sugar into a bowl and mix until fluffy.

Add your vanilla extract and water and mix. Slowly add your flour, mixing it in well. (We tend to use our hands at this point to form a ball, ready to roll out – I split it into two balls here to share between the kids).IMG_3249.JPGRoll your biscuit dough out onto a floured surface. We always pop some flour onto the rolling pin too, to stop it from sticking.IMG_3251.JPGThen use your cookie cutters to cut out some Christmassy shapes! Place them onto greaseproof paper on a baking tray.

Bake them in the oven for approx 15 minutes or until golden brown. Leave to cool and sprinkle with some caster sugar.

Now you can make some icing with your icing sugar and add whatever decorations you like! We went crazy with sprinkles, sugar balls and sugar gingerbread men!

Our finished biscuits were completely yummy and went down a treat! The kids all had brilliant fun and my nephew especially enjoyed decorating his biscuits (even if it did mean sending him home covered in icing – sorry mum)! We sent some biscuits home for my sister too from my niece and nephew and she loved them!IMG_3287.JPG

These biscuits would make a lovely Christmas gift for teachers, wrapped in pretty cellophane and tied with a cute ribbon. (This was what we made for teachers last year and all of the teachers loved them. My daughter said they ate them at break time with their cups of coffee)!